Timing Cursors & Measuring in Timeline View
Using the Tools Timing button (see "Logic Analyzer Tools ") you can place a set of left and right timing cursors on the timeline. The timing cursors provide a means to measure relative time differences between logic signals, packets, or both, or arbitrary positions on the timeline.
- Enable the Timing button
 .
. - With the mouse cursor In the Timeline, click the left mouse button to place the left ("X") timing cursor.
- Then, anywhere in the Timeline, click the right mouse button to place the right ("Y") timing cursor. The time between the X/Y pair is displayed on a connecting line.
When the + cursor is near a logic signal transition or a packet right or left edge, a down-pointing triangle appears on the transition. Releasing the mouse when the triangle appears, results in the timing cursor snapping to the transition. If there is no snapping triangle, the timing cursor is placed at the location of the + cursor.
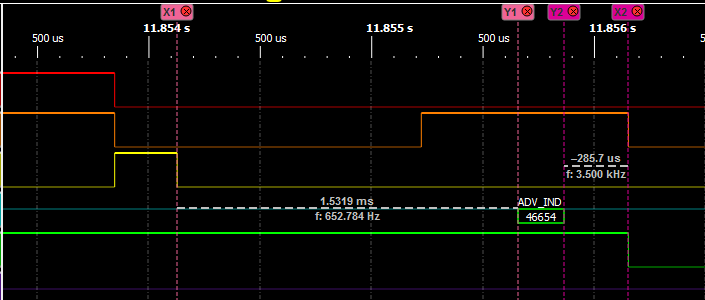
You can place multiple timing cursor pairs on the timeline. The timing cursor pairs are identified with subscript notation: X1/Y1, X2/Y2...Xn/Yn. The timing cursor pairs are locked to the timeline and will expand or collapse with the timeline display.
Timing cursor X/Y pair tags appear at the top of the time scale and are color coded. Vertical lines extend from the tag through the timeline and the lines are color matched to their tags. Between the tag lines is a white dashed connecting line with the time span of the tag pair above the line, and the frequency of the time span (reciprocal of the time) below the line. If the Y-cursor is placed to the left of the X-cursor the time value will be negative, however, the frequency is the absolute time span reciprocal.
Timing cursors can be moved by positioning the mouse cursor over the timing cursor tag, holding and dragging the tag to a new position. When a cursor pair is selected the cursor tag color changes to white.
To remove the timing cursors, click on the red circle "x" in the cursor tag  at the top of the timeline. Clicking in either the X or the Y tag will remove the X/Y cursor pair.
Example: Logic Analyzer Cursor Pairs
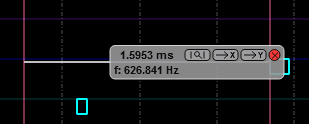
If you click on the cursor connecting time line a navigation bar appears. This bar is especially useful when both cursor are not visible within the Timeline View, such as when you have zoomed in; or for when there are multiple cursor pairs within the same view. Clicking on one of the navigation buttons moves a cursor into the Timeline View. The following table provides a description of the navigation actions.
| Button | Description/Action |
|---|---|

|
Search for Cursor Pair: Adjusts the Timeline View to display both the X- and Y-cursor. The cursors are centered around the middle of the Timeline View. |

|
Search for X-Cursor: scrolls the X-cursor to the middle of the Timeline View without changing the current range of the Timeline view. |

|
Search for Y-Cursor: scrolls the Y-cursor to the middle of the Timeline View without changing the current range of the Timeline View. |

|
Delete the Cursor Pair: Deletes the cursor pair without changing the current range of the Timeline View. |
When a X/Y cursor pair is created, a marker appears in the Navigation Bar. The marker has the same color code as the cursor pair tags. This feature aids in quickly navigating to important parts of the capture time range.

Navigation Bar Time Measurement Cursor Markers