- The Ethernet ComProbe captures bi-directional Ethernet data.
- The Ethernet ComProbe and the analysis PC to which it is connected are invisible to the network.
- The tap does not interfere with auto negotiation/speed or duplex settings.
- The "Permanent Network Link" feature guarantees permanent network connectivity.
- There is no packet loss even if the USB power fails or the USB port is disconnected.
- The tap is compatible with NetDecoder and Ethertest software protocol analyzers.
- The tap is also compatible with the free, open-source Wireshark protocol analyzer
Hardware Settings Information
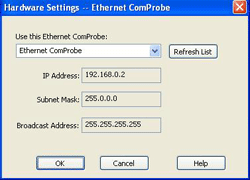
The Hardware Settings dialog allows you to select a specific Ethernet ComProbe device to sniff your Ethernet traffic.

You access the Hardware Settings dialog by selecting Hardware Settings from the Options menu on the NetDecoder Control Window. Select a device from the drop-down list. The NetDecoder analyzer automatically scans and identifies all the Ethernet ComProbe devices plugged into the PC. The IP address, subnet Mask and the Broadcast Address for that particular device are displayed. These are display only and cannot be edited.
Capture Filter Settings
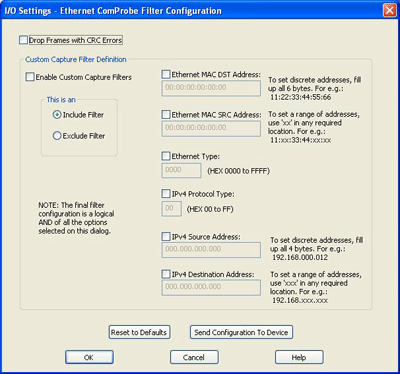
The I/O Settings dialog allows you to configure the Ethernet ComProbe with special capture filters.

You access the I/O Settings dialog by selecting I/O Settings from the Options menu on the NetDecoder Control window. There are a number of settings you can select on this dialog that will affect how the frames are captured and displayed.
At the top of the dialog is one check box:
Remove CRC32 Bytes: When this option is enabled (checked), the Ethernet ComProbe removes the 4-bytes of CRC data from every Ethernet frame before passing it up to the software.
The dialog also allows users to define custom capture filters.
Enable Custom Capture Filter: Selecting this check box either enables or disables the capture filters.
This is an:
Include Filter: When you select this radio button, the Ethernet packets that match the filter settings are captured and displayed.
Exclude Filter: When you select this radio button, the Ethernet packets that match the filter settings are discarded. Only packets that do not match the settings are captured and displayed.
On the right side are six text entry boxes and their corresponding Check Boxes: If any of the Check boxes are unselected, then the corresponding text entry boxes are also disabled.
Ethernet MAC DST Address: Enter the Ethernet MAC Destination Address
Ethernet MAC SRC Address: Enter the Ethernet MAC Source Address
- To set discrete MAC addresses, fill up all 6 bytes. For e.g.: 11:22:33:44:55:66.
- To set a range of MAC addresses, use 'xx' in any required location. For e.g.: 11:xx:33:44:xx:xx.
Ethernet Type: Enter the 2-byte Ethernet Type value in hex. The value can range from 0x0000 to 0xFFFF.
IPv4 Protocol: Enter the one byte IPv4 protocol type. The value can range from 0x00 to 0xFF.
For a complete listing of the Ethernet Types and the IPv4 Protocol types, visit The Internet Assigned Numbers Authority (IANA) website (www.iana.org). Here are some common types and their values:
IPv4 Source Address: Enter the Source IP Address
IPv4 Destination Address: Enter the Destination IP Address
- To set discrete IP addresses, fill up all 4 bytes. For e.g.: 192.168.000.012.
- To set a range of IP addresses, use 'xxx' in any required location. For e.g.: 192.168.xxx.xxx.
- The address must be of the form 'AAA.BBB.CCC.DDD'. e.g. 192.168.112.135.
- None of the individual numbers should be greater than 255.
- For numbers less than 100, use preceding zeroes e.g. '027'. e.g. 192.168.001.028
- Use 'xxx' to denote a range of address in of the 4 sub-fields. e.g. 192.168.xxx.xxx.
After selecting/entering values, it's very important that you understand what the buttons at the bottom of the dialog do when you select them.
Reset to Defaults: When you select Reset to Defaults all options are disabled.
Send Configuration to Device: After setting all the options in the dialog, you must click on ‘Send Configuration to Device’ before ‘OK’ to transfer the settings to the Ethernet ComProbe.
OK: There are two things to consider with the OK button.
- If you click OK before you select Send Configuration to Device, the dialog will close and the settings will be saved, but they will not be transferred to the ComProbe. The settings will, however, be there if you open the dialog again.
- If you select OK after you select Send Configuration to Device, the dialog will close, the settings will be saved and transferred to the ComProbe.
Selecting Cancel overrides all the selections and returns the user to the Control Window.