Opening Data Capture Method
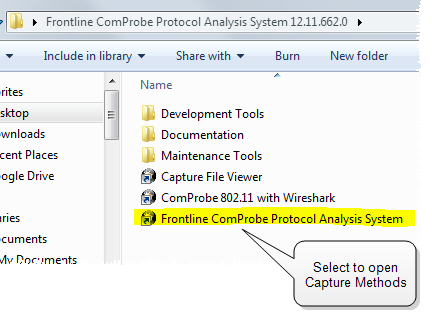
On product installation, the installer creates a folder on the windows desktop labeled "Frontline <version #>".
- Double-click the " Frontline <version #>" desktop folder
This opens a standard Windows file folder window.

Desktop Folder Link
-
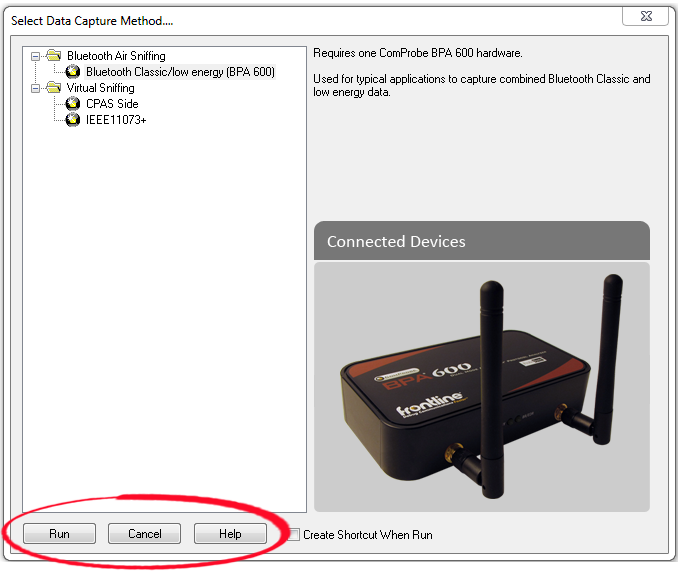
Double-click on Frontline ComProbe Protocol Analysis System and the system displays the Select Data Capture Method... dialog.
Note: You can also access this dialog by selecting Start > All Programs > Frontline (Version #) > Frontline ComProbe Protocol Analysis System

Example: Select Data Capture Method..., BPA 600
Three buttons appear at the bottom of the dialog; Run, Cancel, and Help.
| Button | Description |
|---|---|

|
Becomes active when a capture method is selected. Starts the selected capture method. |

|
Closes the dialog and exits the user back to the computer desktop. |

|
Opens Frontline Help. Keyboard shortcut: F1. |
- Expand the folder and select the data capture method that matches your configuration.
- Click on the Run button and the Frontline Control Window will open configured to the selected capture method.
Note: If you don't need to identify a capture method, then click the Run button to start the analyzer.
Creating a Shortcut

A checkbox labeled Create Shortcut When Run is located near the bottom of the dialog. This box is un-checked by default. Select this checkbox, and the system creates a shortcut for the selected method, and places it in the "Frontline ComProbe Protocol Analysis System <version#>" desktop folder and in the start menu when you click the Run button. This function allows you the option to create a shortcut icon that can be placed on the desktop. In the future, simply double-click the shortcut to start the analyzer in the associated protocol.
Supporting Documentation
The Frontline <version #>directory contains supporting documentation for development (Automation, DecoderScript™, application notes), user documentation (Quick Start Guides and the Frontline User Manual), and maintenance tools.