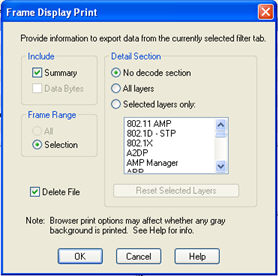
Printing from the Frame Display/HTML Export
The Frame Display Print dialog and the Frame Display HTML Export are very similar. This topic discusses both dialogs.
Frame Display Print
The Frame Display Print feature provides the user with the option to print the capture buffer or the current selection. The maximum file size, however, that can be exported is 1000 frames.
When Print Preview is selected, the output displays in a browser print preview window, where the user can select from the standard print options. The output file format is in html, and uses the Microsoft Web Browser Control print options for background colors and images.
Print Background Colors Using Internet Explorer
- Open the Tools menu on the browser menu bar
- Select “Internet Options…” menu entry.
- Click Advanced tab.
- Check “Print background colors and images” under the Printing section
- Click the Apply button, then click OK
Configure the Print File Range in the Frame Display Print Dialog
Selecting more than one frame in the Frame Display window defaults the radio button in the Frame Display Print dialog to Selection and allows the user to choose the All radio button. When only one frame is selected, the All radio button in the Frame Display Print dialog is selected.
How to Print Frame Display Data
- Select Print or Print Preview from the File menu on the Frame Display window to display the Frame Display Print dialog. Select Print if you just want to print your data to your default printer. Select Print Preview if you want access to printer options.
- Choose to include the Summary pane (check the box) in the print output. The Summary pane appears at the beginning of the printed output in tabular format. If you select All layers in the Detail Section, the Data Bytes option becomes available.
- In the Detail Section, choose to exclude—No decode section—the decode from the Detail pane in the Frame Display, or include All Layers or Selected Layers Only. If you choose to include selected layers, then select (click on and highlight) the layers from the list box.
- Click on selected layers in the list to de-select, or click the Reset Selected Layers button to de-select all selected layers.

Frame Display Print Dialog
- Select the range
of frames to include All or Selection in the Frame Range section
of the Frame Display Print dialog.
Choosing All prints up to 1000 frames from the buffer.
Choosing Selection prints only the frames you select in the Frame Display window. - Selecting the Delete File deletes the temporary html file that was used during printing
-
Click the OK button.
Frame Display Print Preview
The Frame Display Print Preview feature provides the user with the option to export the capture buffer to an .html file. The maximum file size, however, that can be exported is 1000 frames.
If you chose Print Preview, the system displays your data in a browser print preview display with options for printing such as page orientation and paper size. You can also use your Printer Preferences dialog to make some of these selections. When printing your data, the analyzer creates an html file and prints the path to the file at the bottom of the page. This file can be opened in your browser, however, it may appear different than the printed version.
-
Select Print Preview from the File menu on the Frame Display window to display the Frame Display Print Preview.
Frame Display Print Preview Dialog
- From this point the procedure is the same as steps 2 through 5 in "How to Print Frame Display Data" above.
-
Click the OK button, and after a brief wait a browser window will appear.