Note: Capture is not available in Viewer mode.
- Click the Start
Capture button
 to
begin capturing to a file. This
icon is located on the Control , Event Display, and Frame Display windows.
 -
Files are placed in My Capture Files by default and have a .cfa extension. Choose Directories from the Options menu on the Control window to change the default file location.
Note: For the Dashboard, when you capture to series of files, the window displays the data from the beginning of the first capture, even when a new file in the series is created. This is because the Dashboard is a "Session Monitor", which means that even if you capture to a series of files, the data from the first file is always displayed. The display does not refresh when a new capture file in a series is created.
- Watch the status bar on the Control window to monitor how full the file is. When the file is full, it begins to wrap, which means the oldest data will be overwritten by new data.
- Click the Stop Capture
icon
 to temporarily stop data capture. Click the Start
Capture icon again to resume capture. Stopping capture means no data will
be added to the capture file until capture is resumed, but the previously
captured data remains in the file.
 -
To clear captured data, click the Clear icon
 .
.-
If you select Clear after selecting Stop Capture, a dialog appears asking whether you want to save the data.
- You can click Save File and enter a file name when prompted .
- If you choose Do Not Save, all data will be cleared.
- If you choose Cancel, the dialog closes with no changes.
-
If you select the Clear icon while a capture is occurring:
- The capture stops.
- A dialog appears asking if you want to save the capture
- You can select Yes and save the capture or select No and close the dialog. In either case, the existing capture file is cleared and a new capture file is started.
- If you choose Cancel, the dialog closes with no changes.
-
To see how to capture to a single file, choose System Settings from the Options menu on the Control window.
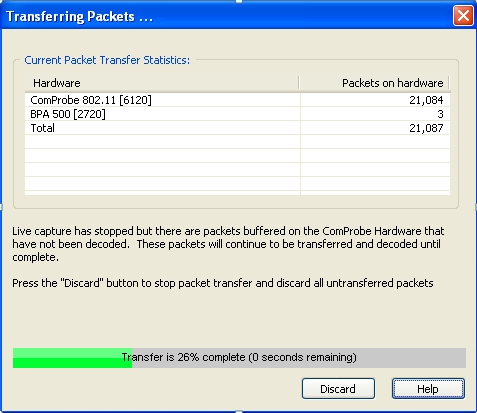
When live capture stops, no new packets are sniffed but there can still be packets that were previously sniffed but not yet read by the ComProbe analyzer. This happens when packets are being sniffed faster than the ComProbe analyzer can process them. These packets are stored either on the ComProbe hardware itself or in a file on the PC. If there are remaining packets to be processed when live capture stops the Transferring Packets dialog below is displayed showing the packets yet to be read by the ComProbe analyzer. The dialog shows the name of each ComProbe hardware device, its process id in square brackets, and the number of packets remaining. These stored packets are read until they’re exhausted or the user clicks the Discard button on the dialog.
Unlike 802.11, Bluetooth packets never come in faster than the datasource can process them. However, Bluetooth packets must still be stored so that they can be read in chronological order with the 802.11 packets.

Packet Transfer Dialog