Timestamping Options
The Timestamping Options window allows you to enable or disable timestamping, and change the resolution of the timestamps for both capture and display purposes.
To open this window:
Choose Set Timestamp Format… from the Options
menu on the Frame Display and Event Display window or click on the Timestamping Option  icon in the Event Display toolbar. The Timestamping Options window will open.
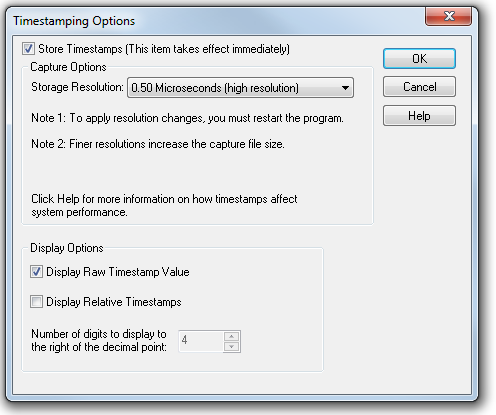
Timestamping Options dialog
To enable timestamping click to make a check appear in the check box Store Timestamps (This time takes effect immediately). Removing the check will disable timestamping.
Changing the Timestamp Resolution
This option affects the resolution of the timestamp stored in the capture file. The default timestamp is 10 milliseconds. This value is determined by the operating system and is the smallest "normal" resolutions possible.
Note: The raw timestamp value is the number of 100-nanosecond intervals since the beginning of January 1, 1601. This is standard Windows time.
 It is also possible to use "high resolution"
timestamping. High
resolution timestamp values are marked by an asterisk as high resolution
in the drop down list. To
change timestamping resolutions:
It is also possible to use "high resolution"
timestamping. High
resolution timestamp values are marked by an asterisk as high resolution
in the drop down list. To
change timestamping resolutions:
-
Go to the Capture Options section of the window.
-
Change the resolution listed in the Storage Resolution box.
Note: If you change the resolution, you need to exit the analyzer and restart in order for the change to take effect.
Performance Issues with High Resolution Timestamp
There are two things to be aware of when using high resolution timestamps. The first is that high resolution timestamps take up more space in the capture file because more bits are required to store the timestamp. Also, more timestamps need to be stored than at normal resolutions. The second issue is that using high resolution timestamping may affect performance on slower machines
For example, if 10 bytes of data are captured in 10 milliseconds at a rate of 1 byte per millisecond, and the timestamp resolution is 10 milliseconds, then only one timestamp needs to be stored for the 10 bytes of data. If the resolution is 1 millisecond, then 10 timestamps need to be stored, one for each byte of data. If you have two capture files, both of the same size, but one was captured using normal resolution timestamping and the other using high resolution, the normal resolution file has more data events in it, because less room is used to store timestamps.
You can increase the size of your capture file in the System Settings.
Switching Between Relative and Absolute Time
With Timestamping you can choose to employ Relative Time or Absolute time.
- Choose
System
Settings from the Options
menu on the Control window, and click the Timestamping
Options button, or click the click the Timestamping Options icon
from the Event Display
 window.
 - Go to the Display Options section at the bottom of the window and find the Display Relative Timestamps checkbox.
- Check the box to switch the display to relative timestamps. Remove the check to return to absolute timestamps.
Note: The options in this section affect only how the timestamps are displayed on the screen, not how the timestamps are recorded in the capture file.
- Display Raw Timestamp Value shows the timestamp as the total time in hundred nanoseconds from a specific point in time.
- Display
Relative Timestamps shows the timestamp as the amount
of time that has passed since the first byte was captured. It works
just like a stop watch in that the timestamp for the first byte is 0:00:00.0000
and all subsequent timestamps increment from there. The timestamp is recorded
as the actual time, so you can flip back and forth between relative and
actual time as needed.
- Selecting
both values displays the total
time in nanoseconds from the start of the capture as opposed to
a specific point in time.
- Selecting neither value displays the actual chronological time.
When you select Display Relative Timestamp you can set the number of digits to display using the up or down arrows on the numeric list.
Displaying Fractions of a Second
- Choose System Settings from the Options
menu on the Control
 window, and click the Timestamping
Options button, or click the click the Timestamping Options icon
from the Event Display window.
window, and click the Timestamping
Options button, or click the click the Timestamping Options icon
from the Event Display window. - Go to the Display Options section at the bottom of the window, and find the Number of Digits to Display box.
- Click on the arrows to change the number. You can display between 0 and 6 digits to the right of the decimal point.