Saving a Portion of a Capture File
- If you are capturing
data, click on the Stop icon
 to pause data capture. You cannot save data to a file
while it is being captured.
to pause data capture. You cannot save data to a file
while it is being captured. - Open the Event Display
 or Frame Display
  window,
depending on whether you want to specify a range in bytes or in frames.
window,
depending on whether you want to specify a range in bytes or in frames. - Select the portion of the data that you want to save. Click and drag to select data, or click on the first item, move to the last item and Shift+Click to select the entire range, or use the Shift key with the keyboard arrows or the navigation icons in the Frame Display toolbar. If the range you want to save is too large to select, note the numbers of the first and last item in the range.
- Right click in the data
-
 Select Save Selection or Save
As from the right click menu
Select Save Selection or Save
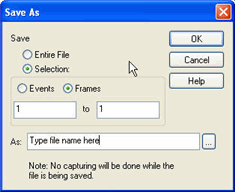
As from the right click menu - Click on the radio button labeled Selection. If you selected a range, make sure the starting and ending numbers are correct. To specify a range, type the numbers of the first and last items in the range in the boxes.
- Select either Events or Frames to indicate whether the numbers are event or frame numbers.
- Type a file name in the As box at the bottom of the screen. Click the Browse icon to browse to a specific directory. Otherwise your file is saved in the default capture file directory.
- Click OK when you are finished.