Message Sequence Chart - Printing
![]() There are three standard MSC print buttons. Print
Preview, Print, and Cancel Printing.
There are three standard MSC print buttons. Print
Preview, Print, and Cancel Printing.
Print Preview
- When you select Print Preview
 ,
the
Print Setup dialog appears.
,
the
Print Setup dialog appears. - You next need to select your printer from the drop-down list, set printer properties, and format the print output..
- Then you select OK.
After you select OK, the Message Sequence Chart Print Preview dialog appears.
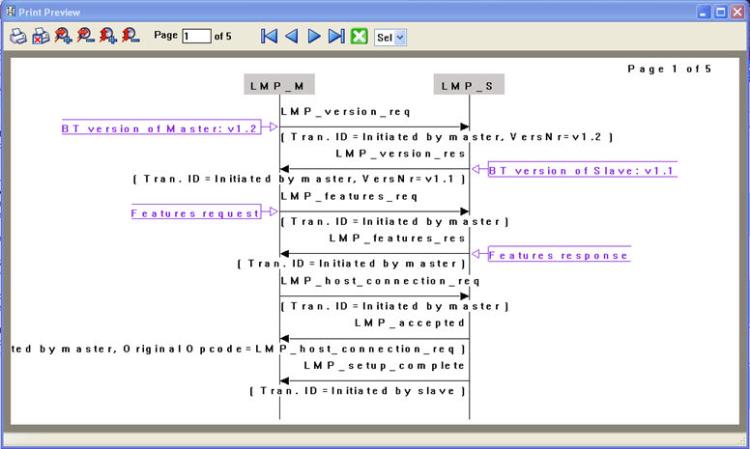
Message Sequence Chart Print Preview
The information in the dialog will vary depending on the layer that is selected in the Message Sequence Chart, the properties of the printer you select, and the amount of data in the layer (which will correspond to the number of pages displayed).
You control what you see and when to print using the toolbar at the top of the dialog.
![]()
Print Preview Toolbar
| Icon | Name | Description |
|---|---|---|

|
Prints all the pages to the printer you select in Print Setup dialog. When you select Print, you will output the data that is currently being displayed. |
|

|
Cancel Printing | Cancels the current printing. |
|
Zoom In Horizontially | Expands the data horizontally so it can be easier to read. |
| Zoom Out Horizontally | Squeezes the data together so that more fits on one page. | |
| Zoom In Vertically | Expands the data vertically so it can be easier to read. | |
| Zoom Out Vertically | Squeezes the data so that more fits on one page. | |
|
Current Page |
The current page text box displays the page number this is currently shown in the dialog. You can enter a number in the text box, then press Enter, and the dialog will display the data for that page. |

|
Page navigation |
If the data requires multiple pages, the navigation buttons will take you to:
|

|
Close Print Preview | Closes the dialog and returns to the Message Sequence Chart |

|
Select Font Size | Allows selection of the print font size from the drop-down control. |